Fallkniven F1 Kydex Sheath
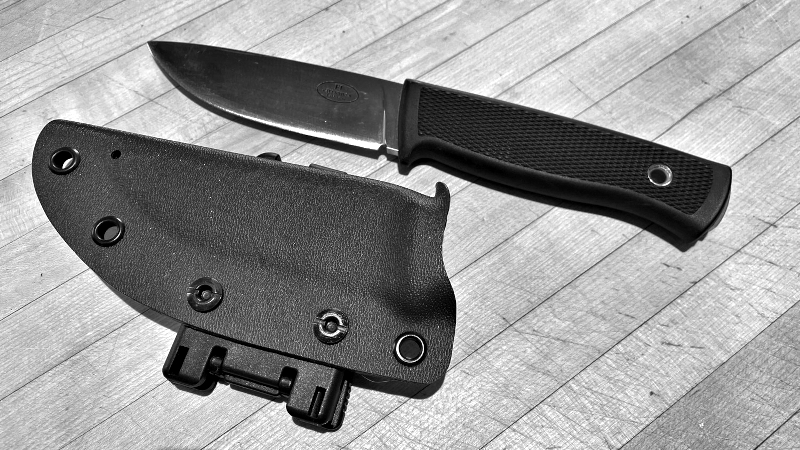
I've owned a Fallkniven F1 knife for many years, but never really used it or taken it anywhere because of the sheath. The standard plastic sheath that it comes with may be perfectly designed for survival knife use or for pilots, which I think the knife was designed for, but for every day use or carry it is horrible. The knife sits loose inside, it rattles, the sheath barely retains the knife and the upper soft webbing is annoying. In my humble opinion anyway.
I've looked online for alternative sheaths for a couple of years and found some leather sheaths or Kydex sheaths, but none really suited my needs and were fairly expensive. So, the F1 sat in a box with other outdoor gear not getting any use.
Several years later I finally decided to try my hand at making a Kydex sheath on my own. This was spurred on by another DIY tool project I was working on that also happened to need a Kydex sheath (more on that in a later blog post). So, I thought making a sheath for my Fallkniven F1 might be a good practice project. It was getting no use anyway so what's the worse that could happen. I might even give it a new lease of life.
Making a Kydex Press
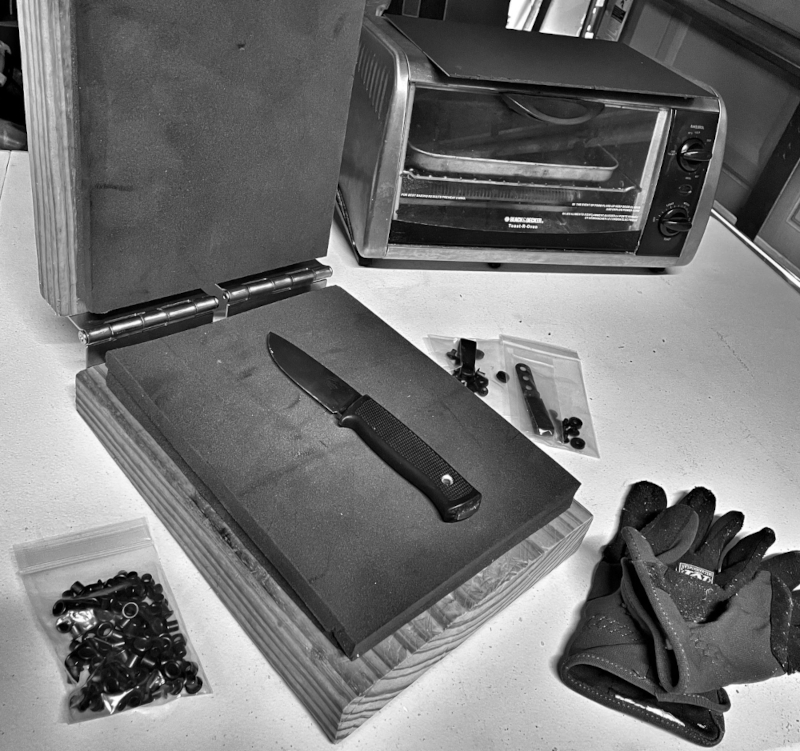
The first step was to make some form of press for forming the heated Kydex around the knife. I search on YouTube and found dozens of videos showing how to make simple hinged presses using pieces of wood and some small pieces of foam. I purchased two door hinges at my local Home Depot and used some scraps of wood I had and small sections of an old backpacking sleeping pad (neoprene) to make the Kydex press. I'm not going to go in to detail, if you want a step-by-step guide check out this video.
Supplies
After more research I settled on using 0.8” thickness Kydex material. This seems strong enough for my needs, readily available and easy to form. I purchased a couple of 12” square sections on OD green from KnifeKits.com along with some 1/4” eye rivets and a rivet setting punch tool. I had some basic power tools, drill press, small toaster oven, and mini bandsaw in my garage workshop, along with a myriad of old hand tools, sanding paper etc.
Sheath Forming
According to several of the Kydex tutorial videos on YouTube University, it is recommended to apply two layers of blue painters tape to the blade of a knife before forming Kydex around it. This provided a small tolerance around the blade inside the sheath after the tape is removed. I prepped my Fallkniven F1 and got organized. I rough cut a piece of Kydex to approximately the size I needed. I had already decided to make a 'taco' style sheath. This requires once piece of Kydex to be folded around the blade and riveted on one side. The alternative is two pieces of separate Kydex and riveted on both sides of the blade - to me this added extra bulk and was unnecessary.
In an old toaster oven, heated to 350-degrees, I warmed my piece of Kydex. I had my sheath press ready along with two clamps. I wore a pair of Mechanix Wear gloves to protect my hands, heated Kydex is extremely hot and similar to handling molten plastic. You need gloves and need to be able to move quickly once the Kydex is up tp temperature. After about 90 seconds I tested the Kydex to find it perfectly soft and pliable. I wasn't able to find good information on what temperature to heat 0.8mm Kydex or for how long, but did find a video describing the right softness of Kydex so you can tell when it's ready. Pretty much trial and error.
I removed the heated Kydex and folded it around the back spine of the Fallkniven, quickly laying it down on the foam of my Kydex press, handle sticking out. I quickly closed the press lid and applied two clamps, tightening as hard as I could. I let this sit for 10 minutes to cool down.
Trimming and Rivet Placement

Once the Kydex had cooled down I removed it form the press and opened up the taco form to remove the knife. I knew I was going to be affixing a Tek-Lok clip to the sheath so that I could wear the knife appendix style (horizontally) on my belt. I marked out my rivet holes, spacing them to match the Tek-Lok and added a few more to secure the sheath. I drilled the 1/4” holes on my drill press and then marked the shape of the sheath using a white pencil. I trimmed most of the excess using a small bench-top bandsaw and finished the edges using sequentially finer levels of sandpaper. Kydex is pretty easy to work with.
I drilled a small hole at the bottom of the sheath right at the tip of the blade to allow for drainage should the sheath or knife get wet, fall into water, or get dirt inside. The last step before riveting was to clean out the inside of the sheath to remove and dust and debris from construction. I used some high pressure air.
I inserted each rivet one at a time and crimped them using my rivet setting die and a small arbor press I had. You could just as easily use a hammer a few small taps. Note: It's important that you use the right length rivets for the Kydex you are using. Mine were specifically for 0.8” Kydex.
Ensuring the Perfect Fit
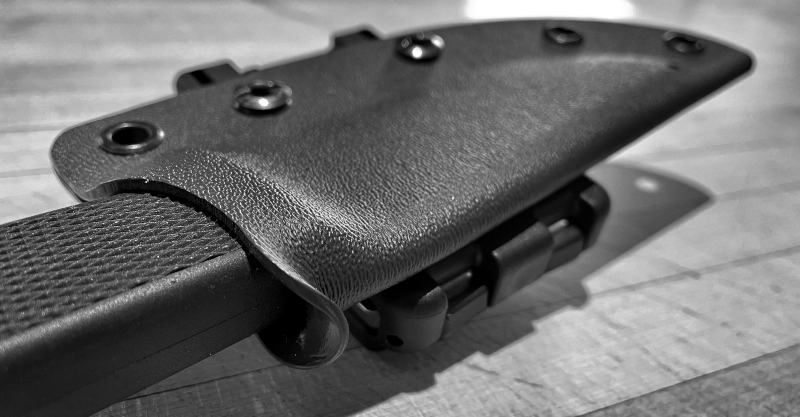
I checked that the knife still fit snuggly into the sheath and was well retained. I noticed that it could use some adjustment and tweaks to fit and be removed more easily. I could describe all the steps here, or you could do what I did and watch this excellent YouTube video by Gentry Custom Knives which walks you through exactly how to ensure a perfect fit. I also took his advice and added a small thumb ramp to make removing the blade easier. I used a hot air gun to carefully heat the top edge of the Kydex sheath and bend it with my gloved finger.
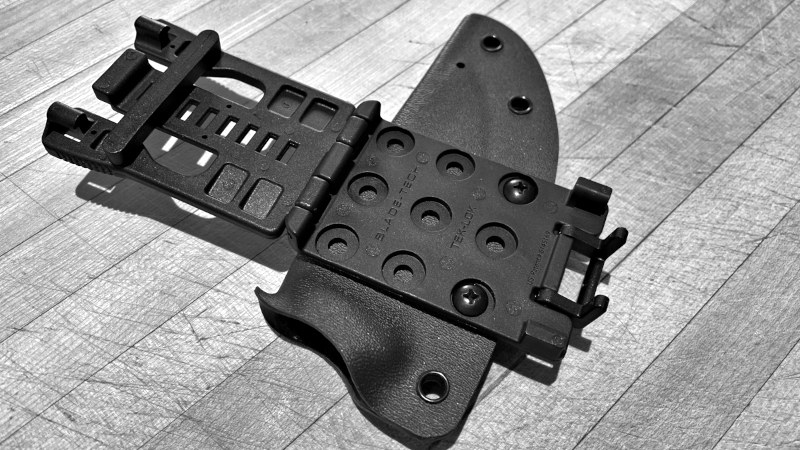
Tek-Lok Clip Mounting
Installing the Tek-Lok clip is extremely easy. Just align the holes that have been drilled and rivetted and determie if you need to have the vet spacer inserted or not - depending on how wide your belt is. And that's it.
The best way to do this is to just try. I had several failures along the way and learned what not to do. The great things about Kydex is that if you mess up in the pressing stage, you can warm it up again in the toaster oven and it will revert to it's original flat form and you can try again. I did discover however, that you can only do this a maximum of three times before the Kydex starts to misform and no longer be an even thickness - that might only be true in a toaster over. Time and more attempts will tell.
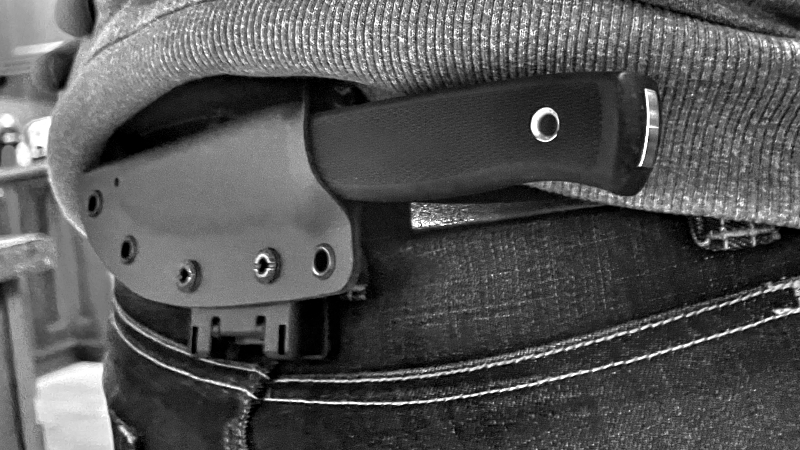
This project was a lot of fun and it gave and old under utilized knife an entirley new lease of life. The Fallkniven F1 is not a small knife, but I can hardly notice I am wearing it using this new sheath in an appendix carry mode.
Resources and Acknowledgements
I hoped you found this useful. I had a blast doing this for the first time and learned a lot along the way. I managed to do this on the cheap with less than $50 worth of materials, which will enable me to make more than this one sheath.
I'd like to acknowledge and give thank to some knifemakers who kindly shared their knowledge through videos on YouTube. I could not have learned how to do this without the many excellent videos shared by Gentry Custom Knives and Simple Little Life. Their videos were incredibly detailed and were the basis of everything I did here. Many, many thanks to both of them for taking the time to make their videos and openly share their skills and expertise to allow others to learn. Please support them in any way you can, subscribe to their channels, like their videos, or purchase some of their excellent knives.
KnifeKits.com - everything you could ever need and more to support your knife making habit - from a utter novice (like me) to an expert. Fast reliable shipping, and competitive prices.
I'd love to hear from you. What do you think about my first Kydex sheath project? Do you love it or hate it? What would you have done differently and what could I do better? Let me know, so that I can get better next time.